Showing posts with label Graphicus. Show all posts

Tuesday, 28 October 2008

Chocolate Resist .........

Mmmmmmmmm must have been what I was thinking when I made this .............


Ok lets start ... This is a great and easy way to do a resist stamping technique and really quick for one of those last minute cards. All in this only took about 25 mins to make.

Main card in a mottled natural cream is an A4 scored and folded to make an A5 landscape card. Main matting layer is the tobbaco brown that I seem to use alot of.

The top layer is the mottled natural cream card which has the resist stamping as the main feature with an overhanging tag with a word phrase and some Grossgrain ribbon.


So lets start - everything apart from my basic card stock is yet again from Graphicus.

I used the cow parsley stamp from the "Wild Meadow" themeplate and the Fine detail embossing powder in white as I want this to stand out from the cream and also to soften the shadow effect.
So after embossing all the flowers I used a brown pigment ink pad to stamp the same images over the white embossed images - now you need a pigment ink pad as when it comes to the Glimmer misting you want this ink to slightly run to give a softer shadow. Don't worry if your colour is covering the white as in the next step this will be misted away !
So with the Crème de Cocoa Glimmer Mist just spritz away, any ink that remains over the embossed flowers can be gently rubbed with either a soft paint brush or cloth.
The white cow parsley heads were filled in with an Inkssentials White Pen to highlight them more and the edges were inked with the brown ink pad to give them some more depth.
The brown Grossgrain ribbon was in the sale items at the Graphicus open day - and anyone in the Graphicus Guild - read your monthly newsletter as there are ribbons in there at a knowdown price !

Below: The topper is one of the large Tags - simply folded over and the corners rounded, quick spritz of Glimmer Mists and the edges inked . The quote was a stamp made by myself .


I'm going to try this in a few other colourways as I think it could look fab in greens or russet reds.

Thursday, 28 August 2008

BLOG CANDY .....

FREE BLOG CANDY
Yes You Read That Correctly
FREE BLOG CANDY
If you have found your way here then you have found one of the 3 Blogs which have been chosen to give away one of the New Elusive Images
“Away with the Faeries”
collection of stamps from the inspiring

" Unicorns ''


To win this magical collection of stamps all you simply need to do is leave a comment here - the winner will be chosen by a random number generator.
.
But hey - don't just leave a comment here - Why not visit Glenda's blog to see the other enchanting Faery stamps and maybe try to find the other two themeplates !
.
Click on the picture of the Unicorn Faeries themeplate to be fairy dusted away to Glendas' wonderful spellbinding blog x and don't foret to go Blog-Hopping to try to find the other 2 sets !!!

Monday, 18 August 2008

Sunset Choir - Glendas' Stampbord Challenge

" Sunset Choir " - AKA Labour of Love !


Ok so Glenda Waterworth aka Graphicus aka Artylicious has set us another challenge competition - this time using Stampbord, so here's my entry and once again I have chosen "Other Item" - this time this is a large 10" square panel picture. The panel picture is based upon a summer evening ( sorry we haven't had too many of those lately ! ) when the birds are giving their last song of the day. Once again everything used is from Graphicus - except my cardstock.

As this is a large panel picture it will sit on an easel frame near my landing window so every time I pass it, the word Inspire will do just that !


How I made it etc all details below . . . . . . . . . . . . . Click the pictures to open them in new window and then click again to see them in their full glory !


All the various Stampbord pieces - 21 in total - were placed in the arrangement I wanted prior to being sprayed, as I wanted the background colours to flow into each other. The main center panel is 6 pieces of 2" square tiles. I used a combination of Glimmer Mists and also Tim Holtz spray inks ( all available at Graphicus ) to create the shaded background working from the green through to the deep russet. The centre panel was rubbed off slightly as I wanted a more highlighted effect for this panel.

The panels in general needed some fore-thought as I didn't want to over stamp each one and the effect I wanted was for the stamped panels to flow on from each other, IE: the vines on the bottom centre panel then flow outwards to the side panels, which in turn the stamping then flows on to the next panel. The same with the centre panel, the foliage from the tree flows down to the top centre panel to match and again on the bottom panel.

The 4" x 6" centre panel was stamped with the Graphicus Guild Members stamp from the June newsletter. The left & right edges were then stamped using the Leaf flourish from the Lily Themeplate . All detailing was made with the scraper tool and various scratches were then rubbed over with colour to highlight them - ( see the birds chests ) this gives a great effect as the colour deepens within the scratches and gives the birds some dimension. Spots of gold were added to the leaves. Before anyone asks I didn't leave gaps between the stampbord pieces as it made the birds look like they were caged - not my kind of thing.

I didn't want to overdo the scratching on the outer panels as these were meant just as highlights to the stamped flourishes. The lettering down the side was stamped with the Sketchy Alphabet as this could really then be highlighted with the scratch tool.

Each stampbord piece was mounted on to black card, then onto a gold pearlescent card - then again on to another black card. Each Matted & Layered panel was then glued to the main gold pearlescent backing card which was then matted to yet another piece of black card.

All in all this has taken over a week to make as I had to do bits in between my other work - hence the labour of love x

Wednesday, 13 August 2008

Buttercup Fields

Ever since my daughter was 2 years old ( 20 years ago ! ) we have always had buttercups in a corner of our garden. She always said they were her flowers and I wasn't to pull them out. We've been asked on many occasion why do we grow weeds ... Weeds .. No they are such lovely flowers and I will always have a little corner somewhere for my daughters flowers.

The card below is inspired from the above and was made using the stunning new Themeplates from Graphicus - the buttercup is from the Fuchsia and not only has the outline version but also a reversed solid version.

The background card is stamped with the outline buttercup head in an Olympia Green Versafine, the next layer is a Glimmer Mists ( I will have to check the colours as I just spritzed away ) the edge was then stippled with the versafine using those lovely little ColorDusters from Judikins ( like mini shaving foam brushes ).
The top layer was fun as this is parchment, you can get the mottled type and the great thing about parchment is when wet is creates dimples - so with Glimmer Mists in hand I lightly spritzed the parchment to give a soft subtle effect. You can see the dimple effect better in the next picture.
I tried various ink pads on a spare piece of parchment as I was after a soft shadow effect for the solid buttercup, the one that gave the look I was after was the Tim Holtz Distress Ink - Peeled Paint which when combined with the parchment gave the soft shadow. The outline buttercups were then stamped over with the Green Versafine. To highlight the buttercup flowers I just used some of the Glimmer Mists - Lemon Zest as a colour wash.
Organza ribbons in limey green and yellow threaded through an antiqued buckle lower down.
Top corner Stampboard - first spritzed with some Glimmer Mists and the same stamping method - soft shadow for the solid and outline for the main.

The text is from Serendipity Stamps which came via Joanna Sheen and are great as they are already pre-trimmed and mounted on to EZ mount !

Remember click any of the pictures to see the full sized versions.

This shows the dimpled effect better of the parchment.
See the glimmer !
The inside was again made with a soft stippled edge and another soft shadow style stamp in the lower corner with the solid buttercup.

Saturday, 26 July 2008

Glenda's Christmas Challenge Part II

Well I was messing about with the Filigree stamps and backing papers today so I thought I'd make another Christmas card for Glenda's Challenge ... Now I am supposed to be sorting the office out but hey I'll do it in a bit !

All items used were from Graphicus seeing as this is Glenda's challenge except my card stock. This is a larger card .... 23½cm long and 15 cm high and made from some scrapbook card stock and based on a monotone card but with a touch of Ice-blue.

The main card was in Black card stock, stamped with the Filigree Stamps down the side in Silver and the edge torn. The right hand side of the card is printed from the Filigree Fusion CD but when the print option comes up you can select to print in just black - TIP ... Adjust the image with the Brightness & Contrast settings to define the pattern more or use a graphics program. There is some fine glittering to the edges of some of the leaves but my camera hasn't picked this up too well.
Remember - Click on the picture to enlarge them.


The Happy Christmas is from the Happy Christmas Greetings Themeplate as this has the matching Filigree background, the greeting was then matted & layered several times. I used watered down Glimmer Mist Patina ( nice ice-blue colour ) as a pale colour wash on some of the leaves.

The tag was matted and layered - edged with the Filigree stamps and the greetings from the Joy Greetings & the Seasons Greetings themeplates. The edges tinted with some black and the watered down Glimmer Mist Patina. Although it doesn't show too clearly the tag has pale ice blue organza ribbons. The flower is layered and comes from the Ruby Tuesday themeplate, some of Glenda's Glitters in Turquoise and Snowflake.

The inside is printed from the Filigree fusion CD.


Right let the office cleaning begin !

Monday, 21 July 2008

NEW Papers . . . Part Deux

So here's what I made from just 1 A4 printed Duo Paper ... and I still had some left over.

What I used .... Turquoise Duo paper from my FREEBIE post, Wild Meadow Stamps - Graphicus , Words of Wisdom - Graphicus , Ruby Tuesday - Graphicus , Damask Squares - Graphicus. One sheet of A4 card, some silver backing card, one tag and some sissal twine and a large eyelet.

This time I have used the pre-printed image as the backing and over stamped with some thistles in a dark teal and there were also some ferns in white but they don't show up too well. This was then mounted on to a silver matting layer and then mounted on to an A5 card. "Be Happy" was stamped on to the plain Duo-paper and matted.

Remember click on any of the pictures to open a larger version.

The top tag is the plain side from the Duo-Paper but layer stamped with the Butterfly from the Damask Squares - first in a light turquoisy-teal colour, then randomly stamped again in a darker turquoisy-teal colour. Finally the Words stamp layered over this. Each layer can still be seen but non overshadows any other layer.

The tag was then trimmed slightly and layered over another tag which had inked edging and mounted on to a silver matting layer.

I'll explain the flower lower down.

The dimensional flower is from the Ruby Tuesday themeplate and was made from just one single stamp .. full process explained further down !

A hidden surprise under the top tag ......

Making a Layered flower from a single stamp .................... This honestly only takes about 10 - 15 minutes to make and the effect is great.

Using the plain side from my Duo-paper - stamp one image, I used Versafine Onyx Black as I wanted to colour wash the central petals.
Now cut out the whole flower as below ...

Next snip down between one of the petals and cut around the inner layer. Do exactly the same for the middle section. This should now leave you with 3 pieces as shown below.

Next cut two segments from the outer ring - but leave lugs that you can use to glue together, cut one segment from the inner layer. What this does is to reduce & tighten the circle size but it also helps it form a floral shape.Now with some wet glue ( pva etc ) stick the little cut lugs together to rejoin the circle on both the inner and outer layers. I used my bone folder to curl the petals and popped some little glitter dots on the center.

Now using the inner lugs and a line of glue around the inner rim glue your outer layer down where you want the flower, then a line of glue around the inner rim of the next layer and finally put the inner center on a sticky pad to raise it up ( I think I used a 3mm ).

Simple flowers but very effective !

The whole card was made with only 5 different stamps ( 2 from the Wild Meadow set, 2 From the Words set and one from the Damask set ) and 3 ink pads - one Turquoise, one Teal one Black.

There are so many options you can use these papers for - I could have used contrasting inks ... ( Note: must find my colourwheel under my desk clutter ) , printing on to vellum for a softer look.

Right my ironing awaits !!!!!!

Sunday, 20 July 2008

Glenda's Christmas Challenge

So Glenda's challenge:
The Challenge: The theme (unsurprisingly) is Christmas
The Rules: Make a card, ATC, or other item featuring Elusive Images stamps in some way.


I opted for " The other item " Hmmnn .... something a little bit different - Stamping on to glass ...

There's something about the soft glows of tea-lights and when combined with Christmas what more could you ask for. So taking something so simple as a cheap old plain glass tumbler ... I turned it in to an embossed glowing Holly Flourish tea-light holder.

So how to:

First the glass tumbler, I just grabbed an old one out of the cupboard, washed and cleaned it and dried thoroughly. Now glass will attract fingerprints static etc - which when combined with embossing do not mix well so use an Anti Static bag - not only on the glass but also coat your fingers !

I used for the main glass the large panel from the Christmas Flourish themeplate with Versamark, to stamp your glass use the stamp on a flat worktop and then roll the glass over the stamp, my glass was slightly angled so I had to start on a slight angle. Check the stamped image - Don't worry if it's not right you can wash it off and try again. TIPS: If you've never stamped on glass before try it with a coloured inkpad first so you can see the image as you are working and adjust your method to get the best imprint. Any practice runs can be washed off.

Embossing: I used a detailed Gold embossing powder and twin speed heat gun on the lower setting, if you only have a single speed heat gun then don't hold the gun as close to the glass.

When the embossing was done I added some red gems for the holly berries and trimmed the glass with some wired ribbon - NOTE: the ribbon I used is wire based.

For the flourish I took another stamp from the Christmas Flourish themeplate with the filigree swirls, after stamping and embossing I cut out the holly leaves and then made some filigrees with some 18 gauge wire in gold, red and green. The wire filigrees were stuck to a holding block and then the holly leaves stuck over the front. A little glitter for the berries to add a little more twinkle and then the holly flourish was stuck to the lower front ribbon.

Please click any of the photos below to enlarge.

Picture 1. I've tried to show the tea-light holder lit in a darkened room but my camera doesn't seem to like that kind of photo so the real effect unfortunately doesn't show up.


Picture 2. Switched lights back on to show the imagery.


Picture 3. After embossing, ribbons & gems - but before adding holly & filigree.

For My Sister

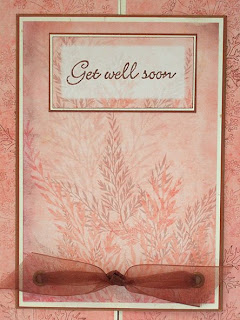
Unfortunately my Sister has been quite ill so I made her this bi-fold card as a cheery get well .

The backing papers are my own design - the very bottom one has been over stamped with an image from the Wild Meadow Themeplate from Graphicus in copper colours.
The topper is again another of my own paper designs with the mini tag stamped with a Get well soon message in Copper. The topper was finished off with some bronzed eyelets and a copper/bronze organza ribbon. The insert again from my own designs.
A simple yet effective card.


Been A While .....

But here I am and I am going to promise to put at least one card or one blogging session on a week !
OK first a couple of Tags that I was playing about with ... You can click any of the pictures to enlarge them.
Made with yep .... glimmered backgrounds , Fleurs et Parfum de Paris from Graphicus and some papers from the filigree fusion CD - again Graphicus.


This was just playing about with some ideas.


More Tags coming soon !

Tuesday, 26 February 2008

Backgrounds using Glimmer Mists and Inks

Now I'm back in the office I'll start again !

Below is a card I'm making for a friend, the background was colour washed over with the Tinkerbella Ink in the Rich Violet colour, then randomly stamped using the filigree swirls from the Damask Hearts themeplate, ( now if you enlarge the picture those eagle eyed amongst you will also notice the smaller versions of these - they were in the December Guilds members offer stamps ) in a deeper violet. The background for both toppers was made with the Glimmer Mists - Pink Bubblegum and also an odd splodge of the Rich Violet. Again I normally do a whole A4 sheet then I can choose what bits I want to use - the spare gets popped in my backing box.
The top left is from the Delightful Damask themeplate, the bottom from the Damask Hearts and the edging around the bottom one was also from the Decembers Guild offer. I purposely didn't want a full on black , more of a worn effect , so after inking up the stamp I gently prestamped on a spare piece of card just to take some excess ink off. I haven't finished the card as I just wanted to show you the effect of making your own backings, the top right image is a piece of Stampbord , coloured using the glimmer mists to match, overstamped with a green then stamped again with the mini Filigree and a little scratching to highlight areas, I still have a couple more to do to finish the card.
Ok so scroll down to see the great backing papers that I started this about ............. Please remember you can click on any of the pictures to enlarge them.


Making your own backgrounds is so much fun, I could spend hours doing this, I tend to sit and play around with my colours. All the backgrounds below were made using the Glimmer Mists Spring Fever set and Tinkerbella inks. I've tried where possible to show alternative views as the colours will change as you move the papers around. All my papers are either A4 or A5 size. As a note - although I call them papers most of my backings are done on card around 200gsm.

Glimmer Mists - Lemon Zest and Rum Raisin, with a final spritz of Irridescent gold.


Below .... Glimmer Mists - Denim Blue and Honey Dew Mist and a splash of Irridescent Gold. This particular backing is to be used with my Peacock stamps from Graphicus


Below .... Glimmer Mists - Denim Blue, Irridscent Gold and Tinkerbella Inks Sky Blue & Teal


This A5 below was what was made from the excess ink and overspray from the above paper, the texture comes from the corrugated board that was below the paper.


This next one is so easy to make , and gives an A4 sheet full of wonderful colour. Just fold an A4 sheet in half, blot - splodge - splatter whatever colours you like on one half and simply fold the card over and rub to mirror the image on the other side, touch up any places as required. Glimmer Mists used - Golden Terracotta and Lemon Zest with a little spray of rum raisin around the edges.


Glimmer Mists - Pink Bubblegum and Rum raisin - just using a spray and holding and turning the card to let it flow naturally.


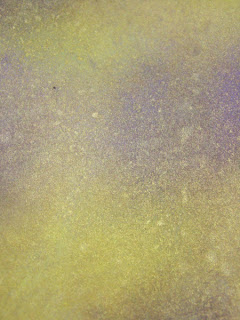
Now the next couple are for some cards I'm making for a friend, and yes the colour really is a Lime Greeny Yellow ! Using Glimmer Mists - Lemon Zest and also some Tinkerbella Ink Sunshine Glow kit. As this is part for a project I've already stamped one section in white and clear embossed it before making the background. Middle section has had some of the leaves touched in - using the Tinkerbella ink. As mentioned - the colours change so beautifully as you turn the page around. The lower picture was made the same way but with a few strokes of Tinkerbella Teal.


These are for the same lady - to go with the above , this time the papers were made with the Tinkerbella inks , the Rich Violet and the Teal ( mixed with some Glimmer Mist Pearl Glimmer ) I have made the A4 sheet sectional as I'm going to be using it in various ways. The top section is a nice grungy texture - criss crossy brush strokes blending into a soft Turquoise. The next sections are much deeper as some of them will be overlayed with a vellum as shown in the pictures which will soften the colour back down.


Ok - back to my favorite colours - I just love these rich warm Russet tones - all again made with the Glimmer Mists and Inks


Well that's just a few of my backings - I hope I've managed to show just what wonderful effects can be gained from just a few simple items and it really doesn't take long.