Saturday 26 July 2008

Glenda's Christmas Challenge Part II

Well I was messing about with the Filigree stamps and backing papers today so I thought I'd make another Christmas card for Glenda's Challenge ... Now I am supposed to be sorting the office out but hey I'll do it in a bit !

All items used were from Graphicus seeing as this is Glenda's challenge except my card stock. This is a larger card .... 23½cm long and 15 cm high and made from some scrapbook card stock and based on a monotone card but with a touch of Ice-blue.

The main card was in Black card stock, stamped with the Filigree Stamps down the side in Silver and the edge torn. The right hand side of the card is printed from the Filigree Fusion CD but when the print option comes up you can select to print in just black - TIP ... Adjust the image with the Brightness & Contrast settings to define the pattern more or use a graphics program. There is some fine glittering to the edges of some of the leaves but my camera hasn't picked this up too well.
Remember - Click on the picture to enlarge them.


The Happy Christmas is from the Happy Christmas Greetings Themeplate as this has the matching Filigree background, the greeting was then matted & layered several times. I used watered down Glimmer Mist Patina ( nice ice-blue colour ) as a pale colour wash on some of the leaves.

The tag was matted and layered - edged with the Filigree stamps and the greetings from the Joy Greetings & the Seasons Greetings themeplates. The edges tinted with some black and the watered down Glimmer Mist Patina. Although it doesn't show too clearly the tag has pale ice blue organza ribbons. The flower is layered and comes from the Ruby Tuesday themeplate, some of Glenda's Glitters in Turquoise and Snowflake.

The inside is printed from the Filigree fusion CD.


Right let the office cleaning begin !

Monday 21 July 2008

NEW Papers . . . Part Deux

So here's what I made from just 1 A4 printed Duo Paper ... and I still had some left over.

What I used .... Turquoise Duo paper from my FREEBIE post, Wild Meadow Stamps - Graphicus , Words of Wisdom - Graphicus , Ruby Tuesday - Graphicus , Damask Squares - Graphicus. One sheet of A4 card, some silver backing card, one tag and some sissal twine and a large eyelet.

This time I have used the pre-printed image as the backing and over stamped with some thistles in a dark teal and there were also some ferns in white but they don't show up too well. This was then mounted on to a silver matting layer and then mounted on to an A5 card. "Be Happy" was stamped on to the plain Duo-paper and matted.

Remember click on any of the pictures to open a larger version.

The top tag is the plain side from the Duo-Paper but layer stamped with the Butterfly from the Damask Squares - first in a light turquoisy-teal colour, then randomly stamped again in a darker turquoisy-teal colour. Finally the Words stamp layered over this. Each layer can still be seen but non overshadows any other layer.

The tag was then trimmed slightly and layered over another tag which had inked edging and mounted on to a silver matting layer.

I'll explain the flower lower down.

The dimensional flower is from the Ruby Tuesday themeplate and was made from just one single stamp .. full process explained further down !

A hidden surprise under the top tag ......

Making a Layered flower from a single stamp .................... This honestly only takes about 10 - 15 minutes to make and the effect is great.

Using the plain side from my Duo-paper - stamp one image, I used Versafine Onyx Black as I wanted to colour wash the central petals.
Now cut out the whole flower as below ...

Next snip down between one of the petals and cut around the inner layer. Do exactly the same for the middle section. This should now leave you with 3 pieces as shown below.

Next cut two segments from the outer ring - but leave lugs that you can use to glue together, cut one segment from the inner layer. What this does is to reduce & tighten the circle size but it also helps it form a floral shape.Now with some wet glue ( pva etc ) stick the little cut lugs together to rejoin the circle on both the inner and outer layers. I used my bone folder to curl the petals and popped some little glitter dots on the center.

Now using the inner lugs and a line of glue around the inner rim glue your outer layer down where you want the flower, then a line of glue around the inner rim of the next layer and finally put the inner center on a sticky pad to raise it up ( I think I used a 3mm ).

Simple flowers but very effective !

The whole card was made with only 5 different stamps ( 2 from the Wild Meadow set, 2 From the Words set and one from the Damask set ) and 3 ink pads - one Turquoise, one Teal one Black.

There are so many options you can use these papers for - I could have used contrasting inks ... ( Note: must find my colourwheel under my desk clutter ) , printing on to vellum for a softer look.

Right my ironing awaits !!!!!!

Sunday 20 July 2008

New Papers .....

I've been asked about the new papers I'm currently designing, the ones shown on my sisters card below. At the moment they are still in the design stage but I suppose I can give you all a sneaky peek ! They follow on from My Four Seasons theme .....


My reasoning behind the papers is that not everyone is a stamper, not everyone enjoys making the backgrounds for stamping on to ... so I'm trying to design some papers that complement and can work with certain stamp themes - be it nature, floral or abstract - instant backgrounds that can be stamped over without detracting from the actual stamp itself but which the most novice of stampers can take a stamp and create a wonderful stamped card.


My card above used one of my printed backgrounds which I then stamped over with some of the flowers from the Wild Meadow Themeplate to enhance it. On the topper I could have stamped some more flowers or even the lovely fern leaves .. but time was of the essence and I really had to get to the PO. I'll remake the card in another colourway and next time stamp over the topper to show you the results.


FREEBIE: For those that are interested when you click on any image it will open in another window - but Click on either of the Turquoise images and in the new window Right Click the image and save it to your PC. They are both full sized duo printable pages, one is A4 which will give you one A5 side plain and one A5 side patterned, the other is an A5 size which will give you one A6 side plain and one A6 side patterned. So you can have a play yourself with your stamps and see what you come up with. I would suggest to print onto card stock rather than paper. If you want to adjust the image size then simply use your graphics program to resize the sheets .
Note : Not sure if this is working right with blogger - if not then I'll upload a zip file with both sized sheets in which you can download.
As per usual - please remember these are my working designs, you may download them for your own personal use but please do not pass the links out and just pop a comment on.


These lower two were me just having a another experimenting session in Photoshop ... Great fun ! I could play on Photoshop for hours :-)

Glenda's Christmas Challenge

So Glenda's challenge:
The Challenge: The theme (unsurprisingly) is Christmas
The Rules: Make a card, ATC, or other item featuring Elusive Images stamps in some way.


I opted for " The other item " Hmmnn .... something a little bit different - Stamping on to glass ...

There's something about the soft glows of tea-lights and when combined with Christmas what more could you ask for. So taking something so simple as a cheap old plain glass tumbler ... I turned it in to an embossed glowing Holly Flourish tea-light holder.

So how to:

First the glass tumbler, I just grabbed an old one out of the cupboard, washed and cleaned it and dried thoroughly. Now glass will attract fingerprints static etc - which when combined with embossing do not mix well so use an Anti Static bag - not only on the glass but also coat your fingers !

I used for the main glass the large panel from the Christmas Flourish themeplate with Versamark, to stamp your glass use the stamp on a flat worktop and then roll the glass over the stamp, my glass was slightly angled so I had to start on a slight angle. Check the stamped image - Don't worry if it's not right you can wash it off and try again. TIPS: If you've never stamped on glass before try it with a coloured inkpad first so you can see the image as you are working and adjust your method to get the best imprint. Any practice runs can be washed off.

Embossing: I used a detailed Gold embossing powder and twin speed heat gun on the lower setting, if you only have a single speed heat gun then don't hold the gun as close to the glass.

When the embossing was done I added some red gems for the holly berries and trimmed the glass with some wired ribbon - NOTE: the ribbon I used is wire based.

For the flourish I took another stamp from the Christmas Flourish themeplate with the filigree swirls, after stamping and embossing I cut out the holly leaves and then made some filigrees with some 18 gauge wire in gold, red and green. The wire filigrees were stuck to a holding block and then the holly leaves stuck over the front. A little glitter for the berries to add a little more twinkle and then the holly flourish was stuck to the lower front ribbon.

Please click any of the photos below to enlarge.

Picture 1. I've tried to show the tea-light holder lit in a darkened room but my camera doesn't seem to like that kind of photo so the real effect unfortunately doesn't show up.


Picture 2. Switched lights back on to show the imagery.


Picture 3. After embossing, ribbons & gems - but before adding holly & filigree.

For My Sister

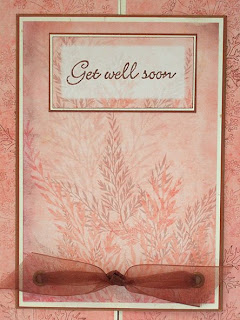
Unfortunately my Sister has been quite ill so I made her this bi-fold card as a cheery get well .

The backing papers are my own design - the very bottom one has been over stamped with an image from the Wild Meadow Themeplate from Graphicus in copper colours.
The topper is again another of my own paper designs with the mini tag stamped with a Get well soon message in Copper. The topper was finished off with some bronzed eyelets and a copper/bronze organza ribbon. The insert again from my own designs.
A simple yet effective card.


Been A While .....

But here I am and I am going to promise to put at least one card or one blogging session on a week !
OK first a couple of Tags that I was playing about with ... You can click any of the pictures to enlarge them.
Made with yep .... glimmered backgrounds , Fleurs et Parfum de Paris from Graphicus and some papers from the filigree fusion CD - again Graphicus.


This was just playing about with some ideas.


More Tags coming soon !